Smart Collections
Here we are, back in the Library module again. Ahh, familiar.
We’ve covered the grid and quite a few of the features in the right-hand panel in the article on Grouping, and the hidden bit above the grid in Filtering, but the left-hand panel has been sadly neglected so far. Time to remedy that and take a look at Smart Collections.
These are just like Collections, but Smart. How cool is that?
Okay, take a step back here. A collection is just like it sounds – a collection of photos. A group of them. A set of them. Some photos with a digital paper-clip on them with a label stuck to it. You can add one or more photos to a collection easily by dragging, or right-clicking individual photos or even a group of them, or any one of half a dozen other ways that Lightroom provides. This is all fine for isolating a few photos that you might want to come back to without going the whole hog of grouping them using the full-on grouping tools, but it’s manual work and I really don’t want to do any more of that than I absolutely must.
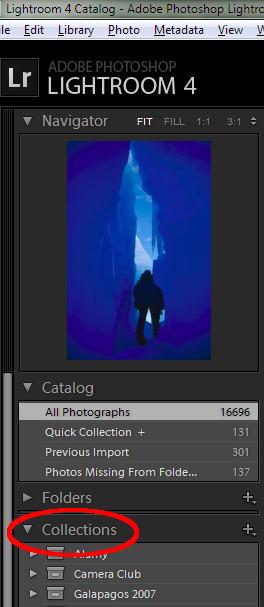
The Collections Panel
Collections are to be found on the left-hand panel in the Library module in a section cunningly called “Collections”. Not there? Sure you’re using Lightroom? Hmm. Right-click on one of the other headings (choose from “Catalog”, “Folders” or “Publish Services”) and you’ll get a menu. One of the items on there is “Collections”, so make sure that it’s ticked and your Collections panel should appear.
So if a standard Collection is just a bunch of manually selected photos, what’s a Smart Collection? How do you fancy having a Collection that updates itself? Well, too bad if not because that’s exactly what we’ve got here. A Smart Collection appears just like a normal collection – that is, a way of grouping a set of photos together without having to move them around on disk – but instead of telling it specifically what photos you want to include, you tell it how to go and find them for itself. Smart indeed.
Right, but how?
As you’ll recall from the Filtering article, it’s possible to… what? Oh. OK, go on then. I’ll wait.
So, as you’ll recall from the Filtering article, it’s possible to use information that’s already with your photos plus information that you add to find pretty much anything you want. EXIF (camera) data, IPTC (subject) data, all the things you can set in Lightroom like keywords, flags, stars and labels can all be used when you’re creating a Smart Collection just like when you’re creating a filter in the grid view of the library module. You can almost think of Smart Collections as though they were filter presets, they do basically the same job. There’s one major and powerful difference to be aware of though, which is that a Smart Collection is much more flexible when it comes to telling it what to find.
Smart Collections just have the edge over Filter presets because of their convenience though. Using a filter takes up a little room at the top of the grid, which you could otherwise use to show photos. Also, collections can be grouped together into “Collection Sets”, which are to collections what “Folders” are to photos; a place for you to store related Collections.
On the other hand, it’s not quite as easy to alter a Smart Collection as it is to alter a filter. It can certainly be done, but whereas with a filter you can generally just fiddle with it and see the results immediately, a Collection needs to be changed by opening a dialog, making changes, and closing it again.
Usually what I do is get the set of photos right using a Filter and then use the filter’s settings to create a Smart Collection that I can go back to really quickly in the future. By putting the Smart Collections into sensible sets I can have as many as I need without cluttering up the single “Filter Presets” menu. It’s no fun at all scrolling through a pop-up menu with hundreds of entries on it to find the one you need. As usual though, Lightroom gives you so many ways of achieving the same task that it’s really up to you to decide which you prefer.
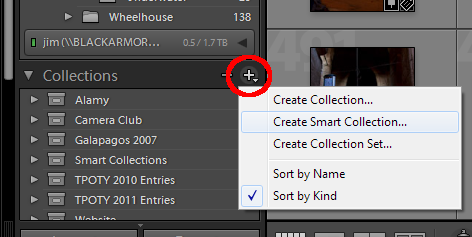
Click the Plus to add a Smart Collection
So let’s build one of these things then, and see how it works. Our task will be to create a Smart Collection that lists all photos taken in the current year with any wide-angle lens. Fairly arbitrary I know, but it’s only to prove a point. To get started then, the first thing we need to do is create a Smart Collection.
Well, this bit is really straightforward, just not immediately visible. If you look on the left-hand panel in the “Collections” header, there’s a plus symbol; click it and you get a menu, and one of the options on there is “Create Smart Collection…” . Do that and you get a new dialog opening which asks what you want to call it (anything you like, of course), and whether you want to put it at the top level or inside a Collection Set. For the time being, just put it at the top level to keep things simple. The next bit is the important bit; it’s where we tell the Smart Collection exactly how to find whatever it is you’re interested in finding.
This isn’t quite as intuitive as it is when you create a filter, but it’s basically the same set of controls. The real difference is that they appear in a list. The other main difference, as I mentioned before, is that you can create more complex Smart Collections than you can with Filters.
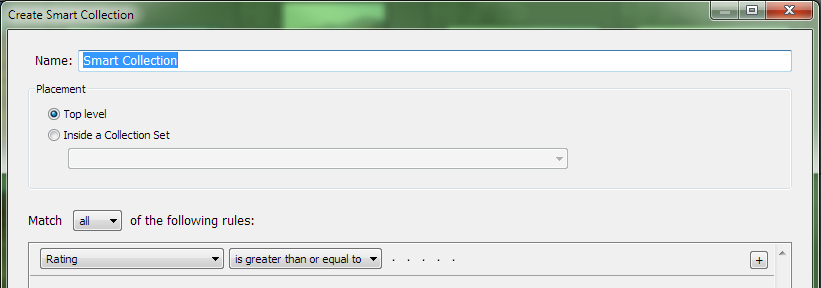
The New Smart Collection dialog
Let’s start simple then. See the little drop-down with “all” in it? This tells Lightroom how to deal with the list beneath. It gives you the option of matching “all”, “any” or “none” of the rules. Right from the outset, this is more flexible than the filtering tools; they only allow you to match “all”. Why might you use the setting to match “none” of the rules? Because sometimes it’s easier to define what you don’t want than it is to define what you do want. For now though, leave it on “all”.
So, the Smart Collection we want has these rules:
- The Capture Time should be in the current year
- The Lens should be a wide-angle lens
Sounds pretty straightforward, doesn’t it? Well, there’s a catch in there which I’ll come to shortly. To start with though, let’s get the date done. In the list of rules, Lightroom has already added one for you. You can’t have a Smart Collection without at least one rule, otherwise it wouldn’t know what to look for and since it needs to have one, Lightroom must create one for you. By default it adds a rule to match any photos with a rating of 0 or more stars. This, of course, matches everything. Let’s edit this first.
Click on the drop-down control where it says “Rating” and you get a (very!) long list of things that you can match as part of a rule. Note the little arrows at the top and bottom of the list, which show that there’s too many to fit on screen. Click the arrows to scroll the menu. For those of you who actually did read the article on filtering, note that the first four items in the list – and therefore the fastest ones to find and use – are the items for labels, rating and flags. Right now though, we need something date-y, and those are further down.
Scan the list for “Capture Date”, and click that. You’ll notice that the rule changes; where you had the options to filter by star rating before, now you have a text-entry box:

The basic Date rule
Well, it’s a start, but what we wanted was to say that the Capture Date should be within a range rather than on a specific date. That’s easy to fix too – just click the second drop-down and it will give you more options for how to match. In this case, there are a couple of options that might do; one is “is in the range”, and the other is “is in this year”. Since this is only an example it doesn’t really matter, so let’s go for the “is in the range” option. You could change the name of the Smart Collection to be “Wide Angle Shots 2012”. Having changed the rule options, we’ve now got two text boxes with the same date in. That’s not much use as a range, so let’s set these. Fairly intuitively, the first box is for the start of the range, and the second is for the end of the range. The dates are both “YYYY-MM-DD” (year, then month, then day), so enter “2012-01-01” for the first of January in the first box, and “2012-12-31” for December 31st in the second. Click “Save” and let’s see what happened.

A Date Range rule
First, you should make sure that you select the “Wide Angle Shots 2012” Smart Collection. You should see immediately that the library grid changes, and that all the photos that are shown have been taken in 2012. If not, check the date range rule in your Smart Collection.
The date rule is pretty straightforward, because it matches an available bit of metadata (the Capture Date) exactly. Getting all photos taken with a wide-angle lens is a little more interesting, because there’s no metadata that says whether any given lens is wide-angle or not. We need to go by the lens name. This raises a second problem; remember the little drop-down at the top of the list of rules, which currently says “Match all of the following rules”? That’s going to be a problem if we want it to match some of the following rules.
If you only have one wide-angle lens, it’s not an issue because you can set another rule up based on the lens name, get the Smart Collection to match all rules, and you’re away. Or so you’d think. In fact, Lightroom can change the lens name if you export a photo so you end up with similar but not identical lens names in the original DNG and the matching JPG that was created from it. So even for that very simple case, we are going to need to match on more than one lens name.
In any case, the first thing we need to do is get a list of the lenses that we’re going to want to match. The easiest way of doing this is to use the Library Filter, because it will very quickly create a list of all the lenses used in whatever photos are displayed. Hopefully you’ve already read the article on filtering and can do this for yourself but if not, here’s a quick overview:
- Make sure you’re in the Grid view of the Library module
- Click on the “All Photographs” item under Catalog, in the left-hand panel
- Click on the “Metadata” item above the grid, in the Library Filter bar
- If “Lens” isn’t one of the lists that appears, then click on any of the list titles and change it to “Lens”.
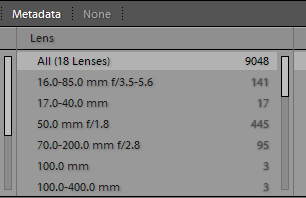
A partial list of lenses in the Filter Bar
You should now have a list of all the lenses that Lightroom thinks you’ve used. Scan down the list and find any that you want to match, and remember that you may well have more than one entry for each lens. The ones that are visible in the screenshot here are the “edited” ones. I have another set which have the full name of the lens including the manufacturer which are just not quite visible here. For every one that you want to match, take a note of the name in a text editor. You’ll need to enter these precisely in the Smart Collection, including spaces and punctuation.
In my case, I’m going to add these names:
- 17.0-40.0 mm
- EF16-35mm f/2.8L USM
- EF17-40mm f/4L USM
- EF-S10-22mm f/3.5-4.5 USM
Yours will almost certainly be different, of course, but it doesn’t matter. Just pick some of your lenses from the list and use those. Now that we’ve got what we want to match, let’s go back to the Smart Collection dialog and work out how to get it to filter on these names. Normally, to add another rule you’d just click on the little “+” icon on the right of the first rule. Another line appears and you change it to whatever you need. Let’s try that first (I know it’s not right, but stick with me here!). Click that little “+” sign and then configure your next rule like this:

Matching a date and one lens
Depending on your photos, you may or may not get anything back from this filter. If you don’t, try extending the date range to something that definitely covers your entire collection. If you still don’t, check the spelling on the lens name; it really does need to be exact. Either way, keep fiddling until you get a decent set of photos returned from this because we want to see what effect the next step has.
At this point, then, you should have a Smart Collection which shows all photos taken in 2012 using one specific lens. Now we need to add the other lenses, but there’s a problem. It’s set to match “all” of the rules, so if we add another rule for a second lens, it can’t possibly work. The lens name can’t be two things at once. Go ahead and try it; open the Smart Collection and add a new rule matching a different lens name. Once you’ve saved this, your grid display should be empty.
OK, you might think, let’s change it so that it matches “any” of the following rules. Go ahead and try it. Looks promising, but it’s still not what we need because now it’s showing any photos which were taken with the “17.0-40.0 mm” lens, or the “EF17-40mm f/4L USM” lens, or during 2012. You do get some photos listed, but now there are too many because we’re including any taken in 2012 with any lens. So how can we avoid this?
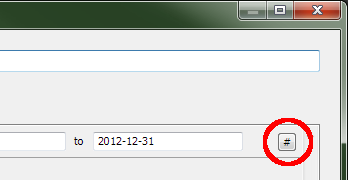
Add a sub-set of rules
One option would be use the Smart Collection and then also apply a filter, but this is really unpleasant because you have to remember to apply the filter every time. We know that the Smart Collection works in the same way as a filter, so there must be a way of doing this. Happily, there is, it’s just not easily visible. Open up the Smart Collection definition again, and remove all the lens-related rules until you’re left with only the one for matching the “Capture Date”. Now, hold down the “Alt” or “Option” key and you should see that the “+” icon to the right of the rule changes to be a “#” instead.
Now click this button and you’ll add a new rule, just like before, but this time you get two lines added instead of one. The first line has a large drop-down list but it’s basically the same choice as in the small drop-down at the top; you can choose to match “any”, “all” or “none” of the following rules. The difference is that this time, you’re telling it to match a sub-set of rules, and each of these is indented slightly so that you can see that they’re part of the sub-set. So, make sure that this sub-set is configured to match “Any of the following” and now add the rules for your first two lenses. You should now have this:
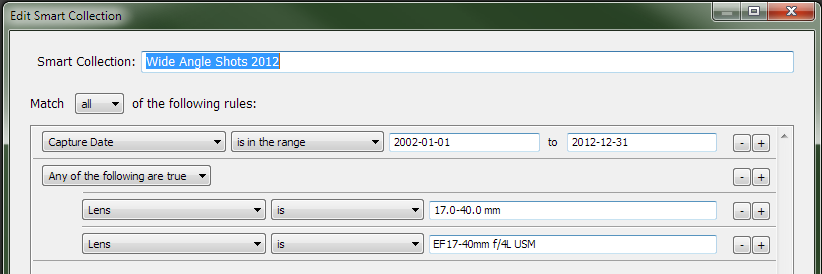
Match multiple lenses and a date
Provided you’ve entered the lens names correctly, this should now be returning precisely what we set out to do; any photos which were taken in 2012, and were taken with either the “17.0-40.0 mm” lens or the “EF17-40mm f/4L USM” lens. You and I know that these lenses are actually exactly the same but as far as Lightroom is concerned they’re different. It’s just comparing the name, letter for letter. If you have any other lenses to add, go ahead and do it now and check that you still get the results you expect. Remember that the filter bar above the grid is a fantastic way of summarising the metadata of the photos in the grid. That is, if you ask it to filter by “Lens” it will show you all lenses in use; ask it to filter by “ISO Speed” and it will show you every ISO speed that’s in use, and so on. You can quickly (ab)use this to make sure that you only have photos taken with one of your selected lenses, and within the right date range.
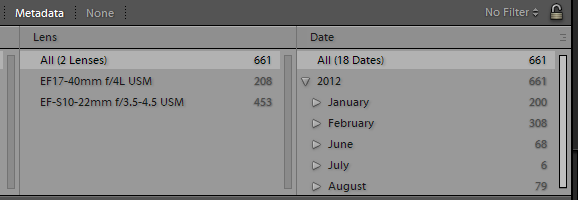
Final results
If you need to get really intricate Smart Collections, you can add sub-sub-sets and so on; just hold down “Alt” or “Option” so you change the button from “+” to “#” and you can add a sub-set anywhere you like, even inside another one.
There’s no performance penalty from using Smart Collections like this, so the only limit is your own inventiveness. Even simple Smart Collections can save you time – remember, they update themselves without needing to manually add photos – but more complicated ones like the one you’ve just built can do a lot more than you might expect. The filter bar can do much of the same work so you can always use that if you prefer, but for the complicated jobs as well as simply being easy to find, Smart Collections rule the roost.
Leave a Reply
You must be logged in to post a comment.