Saving Web Galleries
OK, I admit it, I didn’t really pay much attention to Lightroom’s Web module until recently. Yes, I published a few photos online (at http://www.jimkeir.co.uk if you’re interested), but not very often and it was easy enough that I’d not really thought about streamlining it.
That was until I wrote the Map-based web exporter, which obviously meant lots and lots of re-publishing web galleries during testing and more lots and lots of re-publishing my own, typically about 20 minutes after re-publishing them the last time and 17 minutes after finding the cause of the bad display on page 3.
So, after doing that a few dozen times, I got heartily fed up of re-typing the site title, subtitle, Google Analytics data and various other things that varied between each collection I exported. Typically only to find I’d missed something three galleries ago and had to do it again, y’know what it’s like when you’re running through a long list of similar things whilst in a bit of a huff.
Oh, Lightroom (said I), why have you forsaken me in my hour of being a bit narked at doing things I spent the previous hour doing too?
The “Duh” Moment
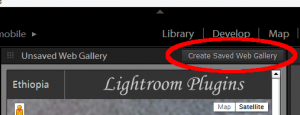
I really should have known better. As ever, Lightroom comes to the rescue with a little button I’d noticed but paid no attention to because it didn’t look important. Take a look above the preview display in the Web Module and you’ll see this:
So, what does this do? Well, y’know the wonderful abilities of Collections and Smart Collections? No? Go read the article if not. Basically you can make your own sets of photos that are based on your choices, not on where they’re stored on disk. Really useful things. Incredibly flexible, powerful ways of slicing and dicing your photo collection…
Uh… oh yeah, web galleries.
So anyway, it turns out that the magic “Create Saved Web Gallery” button does exactly what I wanted. Lightroom will take all the photos you have on the filmstrip and add them to a static collection, and remember all the settings you have in the Web Gallery like titles, colours and export location. Sadly it’s only a static collection, not a Smart Collection, but even so it’s still very useful indeed.
So how do I use this wondrous technology?
In my case I was splitting photos up into separate galleries per country and hand-picking the photos in each collection. Each country had it’s own collection, a different title and subtitle and keywords and so on. If you don’t save the gallery, what happens is that when you pick another source folder or collection, the settings stay in place. Fantastic if you only ever publish one gallery, not so hot if you want to publish more than one.
So, go ahead and pick some photos to publish to the web. You don’t need to go as far as actually publishing them so don’t worry about that, just find a set of photos to think about publishing. I used countries, you can use whatever you have handy. Let’s say “Green Ones”, “Blue Ones” and “Yellow Ones”. You might already have normal, non-web collections to use. Doesn’t matter if you don’t.
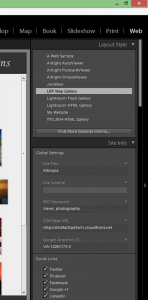
OK, with a bunch of photos selected, go to Lightroom’s Web module and pick a publisher (top right under “Layout Style”. I’m not going to go into the details of actually using the Web module properly right now. If you already know then knock yourself out and set everything just the way you want it; if not, really doesn’t matter a jot. Look further down the right-hand panel and enter some stuff in the “Site Info” bit.
If you’re not a sucker for punishment, just pretend to follow the instructions in the next bit.
Make believe you’ve published the photos. That’s the easy bit. Now you want to publish some other photos – the “Blue Ones”. So, you go back into the Grid module and pick some blue ones and then come back into the Web module (or just stay in the Web module and select the “Blue Ones” collection on the left if you created a collection for them already).
So, you have a set of “Blue Ones” photos ready to go, and you change the site title, upload location, keywords and so on to match. (Like I said, feel free to just pretend, this is all a total waste of time). Now you upload or export your newly-finished “Blue Ones” photos. It’s usually around this time that you notice that you’ve missed an absolutely vital “Green Ones” photo and have to republish.
Yay.
So you select them again (or just pick the “Green Ones” collection), but now all the Web module settings are saying “Blue Ones”.
Yay.
I hope by now you’ve seen just how bloody tedious this gets if you have to go through even a short list of galleries republishing them. If not, just keep repeating the previous few steps until you do, you’ll get there before long.
The Hallelujah Moment
I used to have a battery charger which came in a fetching white plastic case instead of the usual black or silver. Every time a set of batteries failed I’d tell them that they were about to be rescued by a night on a white charger. Which, by way of an extremely tenuous link, is precisely what the “Create Saved Web Gallery” button is.
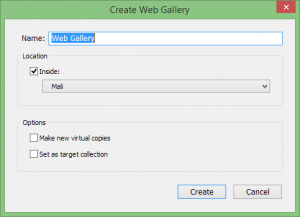
 One way or another, get the right set of photos selected to match the web gallery settings. Once everything’s in the right place, click the button and you’re presented with a very familiar-looking dialog.
The default name’s not overly imaginative, but happily you can change it. Try “Ferdinand” if nothing else comes to mind. You can also put it inside other galleries or gallery sets, just like any other collection, and choose to freeze the state of the member photos using virtual copies.
OK, so far so good. Now go and select the “Blue Ones” photos again. Note that all the settings in the Web module have stayed the same. This is exactly what would have happened had you not created the web gallery. Go ahead and change them to the way you want them, and then hit the “Create Saved Web Gallery” button again. Take whatever name you like. Do bear in mind that picking a name for the gallery that would, if applied to a child, get them beaten up at school is much less satisfying than doing it for real but can be corrected with way less paperwork.
Now for the fun bit. You probably noticed that when you created these two Web Galleries, they appeared in the list of collections to the left of Lightroom’s display. They show in white for some reason I’ve not worked out, but also have a different icon that looks like a little grid of nine squares:
Web Gallery Icons
So if you just created the “Blue Ones” web gallery (or “Marmaduke” as he’s known around here), select “Ferdinand”. The photos in the filmstrip change to the first set, just as they would if you’d selected a normal collection, but all the webby stuff should change too. This means that your colours, titles, keywords – and, just as importantly, the upload settings and destination directory – are the right ones for the “Green Ones” photos. Select the “Marmaduke” web gallery and both the photos and the web stuff change to that set.
Aaaahh. Nice.
You can add and remove photos just the same way you would any normal static collection – I find drag-n-drop is easiest but, as ever with Lightroom, there’s many different ways of doing it. Any changes you make now to the web settings are automagically remembered in the web gallery settings, there’s no need to re-save it. In fact, the “Create Saved Web Gallery” button isn’t there any more.
And what of the “Yellow Ones” photos you so painstakingly selected earlier? Well, go ahead and create another web gallery for them just for practise. I shudder to think what name you’re going to use.

