Keyword Hierarchies
Keywording.
Yech.
You might not have any need for keywording your photos (in which case, what are you doing here?) but if you use them commercially, chances are that you have no choice. Particularly for stock agencies, keywords are key (ahaha) to selling photos because keywords are used at the heart of their searches.
And yet keywording is just so dull. Typing the same set of words over and over again for hundreds of photos. You need to do it, you’ve got to do it, you hate to do it, and that results in having less keywords or lower quality keywords and that affects your sales.
One simple solution is to pay an agency to do it for you. Job done! That certainly is an option, but what if I could help you to reduce the effort needed for keywording? It might just let you keep the job in-house and save a bit of money. If you’re not using your photos commercially and just want enough keywords to let you search and filter successfully, this will very probably be enough.
Setting up Keywords
Now, fair warning; to get the most out of Lightroom’s keywording features you do need to do a bit of work up front. Once it’s done though, it’s done forever and every time you add keywords in the future you win a little of that time back. Once you see how fast it is to add a lot of keywords with minimal effort, I hope you’ll at least give it a try.
I’m not going to cover the “standard” keywording features here – suggestions, keyword sets and the like. This article is about keyword hierarchies, not keywording in general, but just in case I’ll go very quickly over the basics.
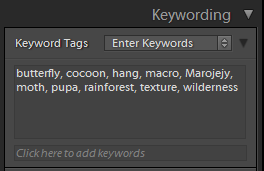
Text boxes for entering keywords
Pick a photo, preferably one without keywords so we’ve got a clean place to start. In the right-hand panel of the Library module, scroll down until you find the “Keywording” section. In the top of that is a box saying “Enter Keywords”, probably, and under that are two bigger boxes which both allow you to type keywords in. Go on, type a keyword in. Whichever box you entered the keyword in, it appeared in the top box. So far, so boring.
Still, one thing seems a bit odd. Why bother having two text areas that let you add keywords? Why won’t one do? What’s that “Enter Keywords” drop-down at the top? There’s more going on here than meets the eye. You get used to that in Lightroom after a while.
Let’s start with that drop-down control. The other options are “Keywords & Containing Keywords” and “Will Export”. Switch this to “Will Export” – I’ll explain why a bit later – and the larger text-entry box suddenly locks itself so that you can’t type into it any more. Don’t worry, you can still put keywords into the smaller box beneath it. You’ve just told Lightroom to show you, as you might have guessed, all the keywords that will be exported for this photo. These are the keywords that would be embedded into the photo itself if you were to export it. They’re also all available for searching and filtering within Lightroom, even if you don’t intend to export the photo to send to an agency.
You might be thinking “so what? I typed the keywords in, I know what’s going to be exported already”. Well, if you’re only using single keywords, you’re right. This article’s about keyword hierarchies though, so let’s move on and find out what the difference is.
What hierarchy?
Obviously your Lightroom library is different to mine, so we’re not going to be working on the same photos, or with the same keywords. It’s entirely up to you whether you add the keywords I talk about to a photo of your own, or make up your own set of keywords along the way. Do try things out if you can though, it makes a lot more sense if you can see what’s happening yourself rather than just read about it.
Here’s my sample photo – a moth or butterfly pupa hanging on a meter-long thread from a tree in Madagascar. If you want to follow the article (key)word for (key)word, download this and import it into Lightroom. Otherwise, pick one of your own photos and make up suitable keywords as you need to.
So, let’s keyword!
Um.
OK, well let’s start with “pupa”, “Marojejy” (the name of the area in Madagascar where the photo was taken) and “butterfly”. That’s a whole three. Now let’s think a bit about related keywords. Well, a butterfly is an insect (yes, I know there’s not actually a butterfly in the photo but it’s a butterfly pupa and it makes the example easier. Humour me here). Let’s add “insect” then. Next, Marojejy is in Madagascar, so let’s add “Madagascar”. That’s in Africa, so let’s add “Africa”.
So when do the hierarchies appear?
Right now! So far all we’ve been doing is adding single keywords, just like you’ve probably done in the past. This isn’t any faster at all. Let’s start to build a hierarchy and see how it helps.
A hierarchy at least for our purposes right now is a list of things where each thing can contain another list of things. It has levels, in other words, just like folders on your hard disk. More specifically, one keyword can contain other keywords, and these can contain other keywords and so on. This is perfect for classifying things which can be grouped the same way, like geographical locations, animal or plant species, makes of cars etc.
Let’s make one. Part of the “Keywording” section in the right-hand panel of the Library module is the “Keyword List”. You might find that it’s closed by default, so if that’s the case click the grey arrow to the right of the “Keyword List” section header to open it up. You should see a long section containing any keywords you’ve added to any of your photos, not just the currently selected one.
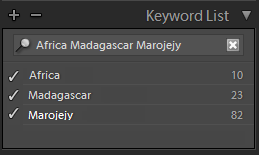
Lightroom’s Keyword List
Now, you need to be a bit careful here because any changes you make to this keyword list will affect all your photos which have that keyword assigned to them. In the search box at the top of the “Keyword List” panel, type in “Africa Madagascar Marojejy”. You should see that the list gets narrowed to only those three keywords, which makes life much easier.
The numbers on the right are the number of times this keyword has been used, and if you hover the mouse over the number an arrow appears. If you were to click on the arrow, Lightroom would immediately show all photos with that keyword. For now though, what you need to do is start building a hierarchy.
How’s that done? Simple. Drag the keyword “Marojejy” over the keyword “Madagascar” and drop it. The list changes, and now “Marojejy” is indented to the right, and Madagascar has an arrow next to it. Do the same for Madagascar – drag it over “Africa” and drop it, and that indenting thing happens again. “Marojejy” is now two levels down.
Now, if you scroll back up to the “Keyword Tags” section you should see… no change whatsoever! Congratulations, we’re done.
OK, maybe not quite. Before I show you what’s happened, go back to the “Keyword List”, search for “insect” and “butterfly”, and drag-n-drop “butterfly” over “insect”. What you’ve done is to tell Lightroom that “butterfly” is a more accurate description of “insect”. What you did before was to tell Lightroom that “Marojejy” is a more accurate description than “Madagascar”, and that that in turn is a more accurate description than “Africa”.
If it’s easier, think of it the other way round. If a photo is tagged as being in Marojejy, it must be in Madagascar and then also must be in Africa. If a photo is tagged with “butterfly”, it must be an insect.
Let’s put this to some use, at last. When I got you to add those keywords before it was really just to make sure that the keywords existed in your Lightroom catalog, so that you could then go on to add them to the hierarchy. It didn’t take long, but it did mean adding every one of those words individually. We’ve only done five keywords on one photo, too. Now let’s try again.
First, return to the “Keyword Tags” section and make sure the drop-down says “Enter Keywords”. Clear all the keywords out so that none are assigned to this photo, and then switch the drop-down back to saying “Will Export”.
So, all of that work and we still have no keywords. OK, try this. Where it says “Click here to add keywords” in the small box, click and type “Marojejy, butterfly, pupa”. Don’t forget the commas otherwise Lightroom will add a single keyword of “Marojejy butterfly pupa” instead of three individual keywords. Now take a look above and you should see this:
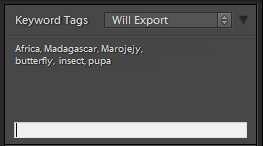
Add three, get six
So what’s happened? Well, you told Lightroom to add the “Marojejy” keyword. When you dropped that on top of the “Madagascar” keyword earlier, you made it part of Madagascar. Now, whenever you add “Marojejy”, you get “Madagascar” thrown in for free. The same happened with “Africa”; “Madagascar” comes under “Africa” ever since you dropped it on there in the Keyword List section, so whenever you use “Madagascar” you get “Africa” for free. The same thing happened for “butterfly” and “insect”. You typed in three words and got six; the word you entered, and every word above that one in the hierarchy.
Hopefully this is beginning to make sense now. By doing nothing more than that quick drag-n-drop in the Keyword List, you get additional keywords added automatically and instantly to every photo that has the word you dragged. It’s not limited to one level either, as you’ve seen. Some of mine are five or six levels deep where I’ve added a town inside a region inside a country inside a continent. I’ve got no idea what kind of photos you take or what keywords you use, but I’m sure you can think of cases where you’ve got keywords with this kind of level-based structure; where, if you add one, you always add the next one up and the one after that.
A Fly for your Hierarchical Ointment
So here we are, merrily setting up sets of keywords and suddenly a spanner appears in your works. You’ve checked out some photos with a keyword of “crane” assigned, and some have a leggy bird (stop sniggering at the back) and some have a piece of construction machinery.
Oh.
Hold on though, it’s OK; Adobe thought of this. You can have more than one keyword with the same name, as long as it’s part of a different hierarchy. Let’s see how to fix this problem.

First, use the Keyword List to create new keywords for “bird” and “machinery” if you don’t already have them. Incidentally, there’s no harm in creating these keywords even if you don’t intend to actually use them, so it’s worth doing it just so you’ve seen it in action. Next, drag your one “crane” keyword into one of the two that you just created – let’s say you drag it into “machinery”.
Next, create a new, entirely different “crane” keyword by filtering the Keyword List on “bird”, and then right-clicking on “bird” and selecting the menu item that says “Create keyword tag inside bird…”. Right, so now we’ve got two crane keywords. Isn’t Lightroom going to get confused?
No, it deals with it just fine. The first thing to notice is that back in the “Keywording” panel, the “crane” keyword now has “machinery” listed after it. This tells you that Lightroom knows that the keyword “crane” exists more than once, and that this particular one is the one that is associated with “machinery”. Why this one and not the “bird” type of crane? Think about it in the order that things happened. First, at some point in the past, you created a keyword called “crane” and assigned that to a bunch of photos. You also created a keyword called “machinery”, possibly just five minutes ago but that doesn’t matter. Next, you told Lightroom that the “crane” keyword should be considered a part of “machinery” when you dragged “crane” over “machinery.” At this instant, all your “crane” photos gained the “machinery” keyword. Next you created a new and entirely different keyword which, coincidentally, was also called “crane”. This was created inside the “bird” keyword but, since this new keyword has never been assigned to any photos, no photos have just automatically had “bird” assigned to them.
The next thing to notice that if you now try to add “crane” to another photo – go ahead and try it, you can always remove it later – when you type the word in, Lightroom opens a little auto-complete menu which shows you exactly which of your two “crane” keywords you’re adding:
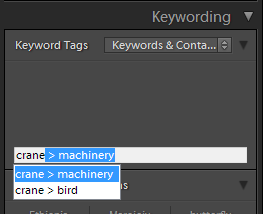
The auto-complete dropdown showing several cranes
It’s in exactly the same format – you have the main keyword, a greater-than symbol and then the parent, making it really easy to see which one you’re about to add. Lightroom uses the same notation anywhere it needs to show that keyword so it’s always clear to you which one you’re using.
Synonyms
Not strictly a hierarchy, but very closely related, are synonyms. There’s no jargon involved here, a synonym in Lightroom is precisely the same as a synonym in real life – it’s a word which is a direct equivalent to another word. These really are useful for keywording, because if you’re selling your photos – or even just searching for them yourself some time after you keyworded them – you want to get as many searches as you can to match your keywords. People use different words for the same thing, so you want to get all those words in your keyword list. Let’s set one of these up.
Consider “pupa”. What other words might people use? How about “cocoon” and “chrysalis”? Well, option A is to type both those words in as individual keywords on each and every photo where they’re relevant. Option B is to get Lightroom to do it for you with only a minimal one-off effort. Guess which one I prefer?
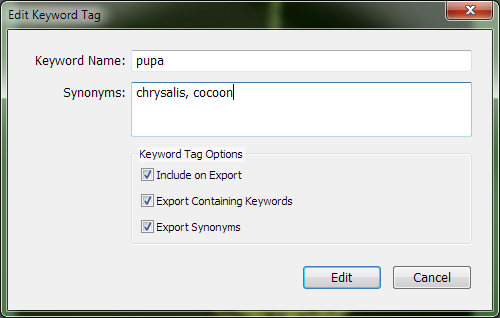
The Edit Keyword dialog
Return to the “Keyword List” and search for “pupa”. Don’t drag this one around anywhere; instead, double-click on it and a dialog appears. See the box labelled “Synonyms”? OK, enter “chrysalis” and “cocoon” in there. For now, ignore the three tickboxes at the bottom. Click “Edit” to dismiss the dialog and save the changes, and go back to the “Will Export” list of keywords to find that nothing has changed.
Never fear! This is just a little glitch in Lightroom. If you make a change to a keyword, Lightroom doesn’t display that change immediately. No matter, we can refresh the list easily by selecting another photo and returning, or by changing the view from “Will Export” to “Enter Keywords” and back again.
Remember, you haven’t added any extra keywords to this photo. It still has only three – “butterfly”, “pupa” and “Marojejy”. Now let’s add a synonym for “Marojejy”; find it in the Keyword List, open the Edit dialog by double-clicking and add a synonym of “National Park”. Refresh the keyword tags again and you should now see this:
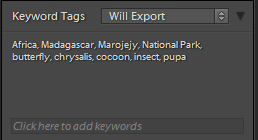
Three keywords only, but all this lot to export!
We’ve got nine keywords added for only three typed in. This is the key – all you need to do is add the most relevant few words and, provided you’ve set up these hierarchical lists, Lightroom does the rest. You don’t need to go through and build these up all at once, of course, just bear in mind when you’re adding keywords that you can group them together like this. If you find yourself thinking “hmm – just added Athens, shouldn’t that come up with Greece and Europe too?”, then take 30 seconds out to set it up and suddenly every photo you have with “Athens” will also have the other two. Yes, you read that right; every photo, not just the ones that you add “Athens” to in the future, but all the ones you’ve already added “Athens” to. You will have just enhanced the keywording for maybe hundreds of photos in 30 seconds, and every time you add “Athens” in the future, you’ll get the other two as well.
It’s actually quite a satisfying job, building these hierarchical relationships. Just the thing for a slow afternoon, with the knowledge that you’re saving yourself time in the future to keep you going.
One last little trick
Remember I said I’d explain the difference between the “Will Export” and “Keywords & Containing Keywords” options for the “Keywording” box? Well, one of the differences is that the latter option doesn’t show synonyms. “Keywords & Containing Keywords” only shows real keywords, not synonyms.
What about “Will Export” though. Firstly, that does contain synonyms but that’s not the only difference. To show you the other one, we need to create a new keyword. Let’s do this a different way, just to show that it can be done. Instead of adding a keyword to a photo and letting Lightroom create it if necessary, go to the Keyword List and right-click. You get a menu with a bunch of options, and one of these is “Create Keyword Tag…”. Do that, and enter a Keyword Name of “_Regions_”. The underscores don’t mean anything really, but they will force Lightroom to put this keyword at the top of the list. As far as computers are concerned, an underscore comes before “A”. Why do this? Get that keyword added and we’ll find out.
This time, make sure that you clear the checkbox for “Include On Export”.
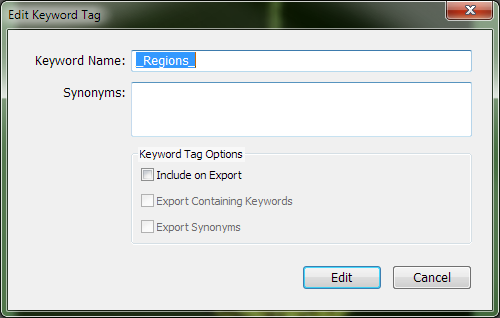
A non-exported keyword
What’s the point of a keyword that’s not going to be exported? If nobody’s ever going to see it, why bother with it? Let’s look ahead a little here. You saw earlier that you can use the Keyword List as a very quick way of filtering on photos with a certain keyword. Remember? Click on the number to the right of any keyword in that list and Lightroom shows you all the photos with that keyword. Right now you’ve probably only got “Madagascar” underneath “Africa”, but let’s imagine you’ve also got “Kenya”, “Ethiopia”, “Uganda” and more. If you were to click on that number to the right of “Africa” you don’t just get the photos with that specific keyword added – there might not even be any – you get all of the photos underneath it too. This is a really powerful and fast way of finding photos.
One step further, and let’s imagine that you also have top-level keywords of “Europe”, “North America”, “South America” etc. You may well have hundreds or even thousands of top-level keywords showing in your Keyword List. You can always type something into the filter box to narrow things down, but since we’ve got the ability to group things together, let’s group all these continents together under “_Regions_”.
This does three things. First, it reduces the number of top-level keywords in your list, and that makes it easier to deal with. Second, and more importantly, it groups related things together which makes those things easier to find; if you want to find a region, you go to the top of the list and open “_Regions_”. Third, because of the underscore (_) character at the start of the name, it puts it first in the list.
There’s a catch here though. You should remember that if you add a keyword, then Lightroom automatically assigns every keyword above that one in the hierarchy. So, don’t we now end up with a keyword called “_Regions_” being added to every photo which has “Africa”, “Europe” or one of the other regions assigned to it? No, we don’t, because you un-ticked the “Include on Export” box. It’s there, it’s added to the photos, you can search for it and use it as a filter, but it won’t be sent out if you export that photo. It’s effectively only visible to you.
So, go to the Keyword List and find the keywords for “_Regions_”, and any regions that you might have. If you’ve been following along, you should at least have “Africa”, so drag-n-drop that on top of “_Regions_” and return to the keyword box. If you switch between the three choices in the drop-down, you should see this:

Three Keyword display options
- Enter Keywords, with only the ones you actually typed in
- Will Export, with all the hierarchy and synonym keywords included except any marked as “not exported”
- Keywords & Containing Keywords, with all the hierarchy including non-exported ones, but no synonyms
Of course, which one of these is most useful to you depends largely on what you’re doing at the time. I tend to find that it’s the “Will Export” display that gets used most.
Well, what are you waiting for? If you’ve already done some keywording you have all the raw material you need to get going. Spend half an hour creating hierarchies with your existing keywords and then at the end of it, show every photo that’s in one of your new top-level keywords and you’ll be amazed at how many relevant keywords you’ve added to photos you thought you were done with.

Leave a Reply
You must be logged in to post a comment.