Import – Advanced Options
Before you can filter, before you can group, even before you can keyword, you need to get some photos into Lightroom. Now I know what you’re thinking – easy, plug in the card, click OK – but there’s a little more to it than this if you want there to be. The standard import dialog hides a huge amount of capability that you might not know about, or have maybe just looked and glossed over.

The small import dialog
If this is what you see when you insert a memory card or use the “File->Import Photos and Video” menu, click the arrow to expand the dialog and let’s take a look at what we’ve got. I’m going to assume that you already know how to use the basic functions of the Import dialog – source and target selection – and concentrate on the more advanced bits. Hence the article name, really.
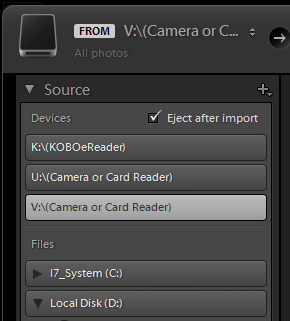
Source Options in the expanded dialog
The Left Bit
Let’s start with the simple advanced stuff. On the left of the large import dialog we have a list of potential sources – places Lightroom thinks you can import photos from. Lightroom handily keeps “Devices” – things it recognises as removable disks – at the top. These are most likely what you’re going to be importing from most of the time, so it makes sense to keep them handy. At the top where it has the picture of a hard disk, it’s possible to just click and bring up a quick-access list. This also has the “Devices” and “Files” sections, which just act as another way of selecting them in the real list further down. More useful is the “Recent” section of the quick-access list, which remembers places from which you’ve imported photos from in the past.
Nothing enthralling so far, then.
The only other thing of note in this part of the screen is a little tickbox which only appears when you select a source, to the right of the “Files” header. It’s labelled “Include Subfolders”, and does pretty much what it says on the tin. Normally you’ll want this to be ticked, because most cameras put photos in sub-folders on the memory card – those are the ones called “DCIM0123” or similar – so this saves you going into each and every folder to import photos. The only time this tickbox might not be welcome is if you’re importing from a network disk; scanning these for photos can take a huge amount of time, and Lightroom will appear to have locked up while it scans.
The Right Bit
Ah, here’s the fun stuff. Just like the Library module, the control panel down the right-hand side of the advanced import display is split into sections, with each section expandable. Click on the arrows to the right of the headings to expand and contract them, just as usual. So, without further ado and in descending order of height:
“File Handling” Section
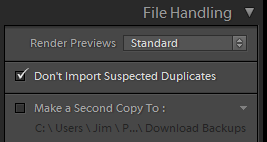
File Handling options
This is about as straightforward as it gets, so I’m not going to spend much time here. First, you can choose which type of Render Previews get generated during the import. Lightroom usually creates fast-loading previews of photos and stores them in a cache on disk, to save the effort of reading and decoding large and complicated files every time you view a photo. These also get used for the Library module display, so they do make that rather more snappy if they are present. Really the choice here is between “Standard” – which is a big enough preview to get a decent idea of what the photo looks like – or “1:1” which is full-size and will let you zoom into the photo without having to wait those few, irritating seconds while it looks all fuzzy. Naturally, the full-size previews take up more room on disk.
Next, we have “Don’t Import Suspected Duplicates”, which tells Lightroom not to… eh? Right. Moving swiftly on, only pausing to mention that if you do think you have duplicates then you should try out the Duplicate Finder plugin, we come to the option to “Make a Second Copy”. I’ve never used this option myself, but if you like to keep completely separate backups to a different disk, maybe, or just a different section of disk which you keep as pristine copies, then this is the way to do it.
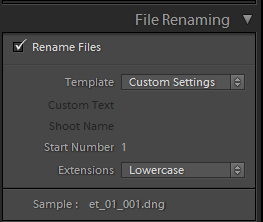
File Renaming options
“File Renaming” Section
Now we’re getting into the more useful stuff. We all know that you can rename your files anytime you like after they’ve been imported. If you always rename things the same way though, then you might as well do it from the import dialog because it can save you a job later. Yes, I know it’s still a job to do no matter where you start it from, just humour me here.
This section has the same controls you get in the “Rename” dialog from the Library Module; you define a renaming template which tells Lightroom what the new names should look like in general, tell it where any sequence numbering should start – usually 1, but you can change it if necessary. Changing the case of the extension is really only cosmetic; I certainly don’t care whether files are called “something.DNG” or “something.dng”, I just prefer the lower-case because it looks nicer.
Finally and most usefully, we have the “Sample” text, which shows you what the first of the imported files will be called. This is really handy for checking at a glance whether your file renaming template is correct.
These templates are available on the “Template” drop-down, which is identical to the one used in the Library Module. The drop-down itself has a load a predefined templates available, but you can add to these if you choose the “Edit…” option right at the bottom of the list.
The Filename Template Editor
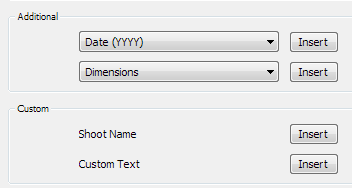
Renaming Options
And as a quick bonus guide, here’s the most important points about the Filename Template Editor. The purpose of this is to let you define a pattern to which new files – or old ones, for that matter – can be renamed. This can be straight text, but the point of this dialog is to let Lightroom make the names up for you using things it knows about the photos. When you import, it really doesn’t know much except for what the camera has added – EXIF data in other words – but there’s still a wide choice of things to add.
The easiest way to create your renaming pattern is to use the drop-downs in the dialog to build it up. Anything that’s static text can just be typed into the box near the top, but the real fun comes from the options further down where you can tell Lightroom to put in different things for each photo, including sequence numbers. Lightroom provides a special code for each different type of data that you can include, so all you have to do is pick the right one from the drop-down and click “Insert”.
One section that bears pointing out more closely is that called “Custom”. On the face of it, this doesn’t seem to do much; there’s no drop-downs, just two items called “Shoot Name” and “Custom Text”. Not much point then, you might think, but if you add one of these items into your filename template and click “Done”, something changes in the Import dialog. In the “File Renaming” section, there are two text-boxes labelled – yes, you guessed it – “Custom Text” and “Shoot Name”. If your filename template has either of these options included, then the text box is made available and it gives you an even easier way of changing some of the text in your filenames.
My preference is a template of “{Custom Text}_{Sequence # (0001)»}”. This lets me type a common prefix into the “Custom Text” field and have Lightroom auto-number the photos as they get imported. This gives me something that’s a bit more meaningful than the “_IMG_1234.CR2” that comes out the camera, provided I make the prefix something that’s actually got meaning! I usually use a two- or three-letter code for the country the photos are taken in, and then another sequence number so that if I’m lucky enough to have visited that country more than once, the photo names are still unique. So, a prefix like “ge_02” would mean that these photos were taken on my second trip to Germany, for example. The full filenames would be “ge_02_0001.dng”, “ge_02_0002.dng” etc.
“Apply During Import” Section
Tcheh. This section’s only got three things there, this won’t take long.
Wrong!
This is one of the most powerful sections of the Advanced Import Dialog, and it’s a real shame that it looks so sparse. There may only be three settings, but they’re each tremendously powerful and can save you lots of time later if you just get them done during the import. Let’s take a look.
First we have the “Develop Settings” drop-down. If you click on this you’ll find that it is a drop-down list of all of the presets you have defined in the Develop module. OK, well that’s moderately useful I suppose, if you know that you always start by applying the same develop preset to everything. Not that useful though, because normally each photo will require a different set of Develop settings, if only because of different noise at higher ISO settings.
In fact, this option is best left as “None”, provided that you’ve read the article on applying develop settings during import. If this drop-down is not left on “None”, then it prevents any of the automatic assignment of develop settings that Lightroom can do.
Next is another simple, innocent-looking drop-down labelled “Metadata”. Rather bizarrely, this one has an extra menu item called “New” which takes you to the exact same place as the Lightroom-standard “Edit…”. Whichever one you choose, you end up in a new dialog called “Edit Metadata Presets”. Another refugee from the Library module (Metadata menu, if you’re wondering) this allows you to pre-fill as few or as many of Lightroom’s metadata fields as you like. Metadata is the combined name for all the stuff that Lightroom knows about each photo; specifically though, this dialog is all about IPTC metadata, which refers to the content of the photo rather than the technical details, all of which are rather handily filled out by your camera.
I’m certainly not going to detail the precise use of each of the fields that you can fill out, there’s hundreds of them. Just read down the list and see if anything sounds useful. As a quick starting point though, you might consider some of these things:
- Enter a label of “Unprocessed” to let you easily find photos that you haven’t touched yet. You would only need to remember to remove the label after you’ve edited them.
- It’s often useful to add copyright information automatically so that you don’t need to remember to add it if you publish photos online.
- The same goes for Creator information. This will be the same all the time – or, at least will be one of a set of people if you have more than one photographer importing into a company-wide catalog.
- Much of the information here will vary for each photo, for example model name and age and property release status, so these will usually be left blank.
As an example, let’s get your personal details set up so that all your photos get tagged with contact and copyright details.
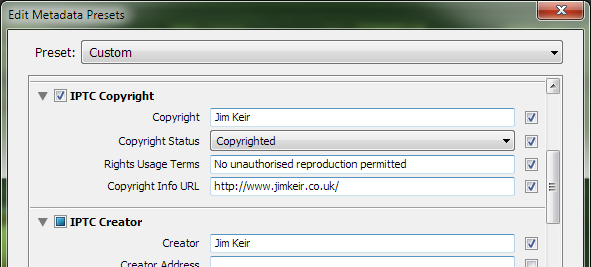
Some example metadata settings.
Right; ignore the drop-down right at the top which says “Custom”. “What dropdown?” is the correct response at this point, otherwise you’re not ignoring it… Now take a look at the content of the dialog. I’ve scrolled down the long list of sections to the one labelled “IPTC Copyright”. See the tickbox to the left of that title? It’s a shortcut to setting or clearing all the tickboxes for the individual data items. As you might expect, only the items with a tickbox to their right will actually be applied by Lightroom. This might seem unnecessary – if nothing’s in the text box, don’t apply it, surely – but it has the side-effect of letting you apply empty metadata as well. For example, let’s say that you’re not importing directly from a digital camera but from photos sent to you by an agency. Let’s further say that the terms of your contract with them lets you clear out their “IPTC Creator” data. By ticking the boxes to the right of the relevant fields in the “IPTC Creator” section and not typing anything into the matching text boxes, you can effectively remove metadata during import as well as adding it.
If you scroll right to the bottom of the list there’s also a “Keywords” box. This may or may not be useful to you depending on how you use keywords. Still, if you want to have some keywords assigned to every photo you import with this preset, you can enter them here. Probably best not to add keywords here that are specific to the photos you’re about to import though. I still stumble across photos with the “Kennet Canal” keyword assigned to them from the time I set something here as a test, and forgot, and then imported everything for the next six months without paying attention.
Hmm… skip back a bit? What did I mean by “this preset”? Well, any time you have a load of related settings like this, Lightroom usually offers you the option of creating a “preset”. This is just a saved group of settings that you can assign a name to, and then quickly get back to them in the future by using that name instead of re-entering stuff into 48 different text boxes. Remember I said to ignore the “Preset: Custom” drop-down? Well, you can stop ignoring it now.
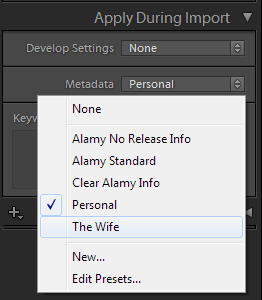
Drop-down menu with metadata presets.
If you click on that drop-down, you’ll find an option called “Save Current Settings as New Preset…”. Choose that, and you’ll be asked for a name. Since you’ve entered your own copyright data (c’mon, you didn’t really type mine in, did you?) you might give your new preset your own name. If you also import other people’s photos into your catalog you could do the same for them, maybe creating one called “The Wife”. (If you’re a Mormon, repeat as necessary).
Changing the settings later is as easy as creating them in the first place. Lightroom notices that you’ve changed something and changes the title in that drop-down to say “(edited)”. All you need to do to have it remember the new settings is select the “Update Preset (name here)” option.
Incidentally, this option is also available in the small Import dialog along with the next box…
Keywords
We all know and love keywording, right? You might have glossed over the “Keywords” box in the import dialog, dismissing it as something to be done later. Much later. That’s fine if that’s what you prefer, but by adding one or two keywords here you can give yourself a little headstart – and possibly a reminder – of what the photos were when you do come back much later. There’s no point in adding things like dates, they’re already recorded by your camera, but maybe a location or the model’s name might come in handy. This box expands on any keywords you might have added to a Metadata Preset, so you might use that for things like the photographer’s name and this separate box for things that will be different for each import.
And finally, we approach our
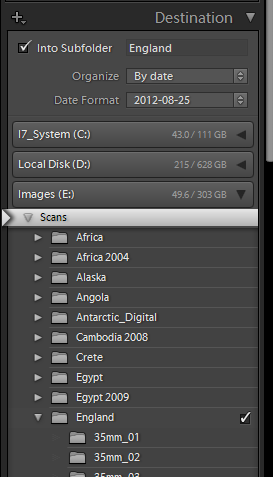
The Folder List
“Destination” Section
… which, as you will have already seen, is more or less identical to the folder list in the Library module. This should be fairly intuitive; temporarily ignoring the topmost options, you have a list of disks and folders. Pick the folder to import into, dead easy. How you organise your photos on disk is entirely up to you. If you understand how to use Lightroom’s excellent sorting and grouping capabilities it really doesn’t matter where your photos are on disk because you can organise them any way you like inside the Library.
For the sake of completeness though, let’s go through the less-obvious parts of the Destination panel.
First off, see that arrow to the left of the “Scans” folder in the screenshot? Looks as though it’s rather unnecessary, doesn’t it – after all, the folder’s already highlighted. Curiously, it turns out that you can drag this up and down to highlight other folders; hold it in place over a folder that’s not expanded and it will expand after a couple of seconds. I’ll cheerfully admit that I have no idea whatsoever why dragging this arrow around might be faster or easier than just clicking on the folder in the list, but if you find that it is, the option’s there. Answers on a comment, please.
Considerably more useful – to my eyes at least – are the “Into Subfolder”, “Organise…” and “Date Format” options. Firstly, the “Into Subfolder” might seem like another duplication of effort; you can already pick a folder from the list, so why bother typing one in? The difference with this control is that if the folder doesn’t already exist, Lightroom will create it for you so this is an easy way of doing two jobs in one. The next options – “Organise” and “Date Format” – allow another automatic refinement of the name. It’s worth pointing out that we’re talking about folder names now, rather than file names, which are decided further up in the cunningly-labelled “File Renaming” section.
“Organize” gives you the option of putting all your imported photos into a single folder or into individual folders for each date. The date that’s used is the date the photo was taken rather than “today”. If you choose this option, the “Date Format” lights up and the little drop-down there gives you a selection of different date formats. Again, which one you use is entirely your preference. One tip here is that if you use the “YYYY-MM-DD” format (Lightroom will show the current date as an example, so it will appear as something like “2012-08-26” instead of “YYYY-MM-DD”), then the resulting folders will show up in date order in the Library module, and also in Explorer or Finder. This is just a cheap conjuring trick; folders are usually sorted alphabetically, and this date format by happy coincidence creates alphabetically-sorted dates.
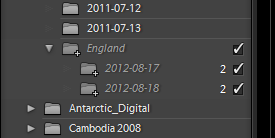
Folders used by the current import.
And there’s just enough time for one last trick to be aware of in this section. Although it should be fairly clear where your photos are going to end up based on the folder selection and other options, it’s not always absolutely clear. Lightroom does what it can by automatically expanding the folder tree where your photos will go and showing little ticks next to folders that will be used, but depending on how you are naming your folders and what already exists on disk, they might not all be visible. By the way, clicking on those little ticks selects and de-selects photos to be imported in the main grid.
You may have noticed that to the left of the “Destination” panel heading is one of Lightroom’s “+” symbols which usually means that something’s been tucked away out of sight. This particular “+” symbol brings up a little menu with an option to create a folder, and two options which affect how the folder list is displayed. The first option, “All Folders”, is pretty clear but the second option – “Affected Folders Only” – warrants a quick click. If you select this, it narrows down the folder list to only those that would have photos imported into them. This makes it blindingly obvious that, in the screenshot here, I’ve set it up incorrectly; “England” shouldn’t be inside “Angola”. Sadly, what this gains in clarity it loses in capability; while it’s easier to see that it’s wrong, you can’t change the destination folder without switching back to the “All Folders” view.
The Bottom Bit

The Bottom Panel
Finally, and easily overlooked, there’s a small panel at the bottom of the Advanced Import Dialog with a single control labelled “Import Preset”. This one is also available on the smaller, standard import dialog. Just as with many other Lightroom features, you can store a bunch of settings for later use. So, once you’ve gone round and configured all of the advanced options about file naming, keywords, metadata, folder structure, develop presets and the like, you can save the whole lot as an Import Preset.
As ever, click on the drop-down (where it says “None” in the screenshot above) and choose the “Save Current Settings as new Preset” option, and give it a name. There’s no need to do this if you’re not going to change your import settings often, Lightroom remembers the last settings you used without being told to, but if you change settings often then making use of this preset will save you a little time.
So if you can take some time to get all of these options set up, it will save you time in the future and help avoid the cases where photos go to the wrong places, or get overlooked, or badly keyworded because you just can’t remember the details when you get round to keywording them. Go take some photos, and happy importing!
Leave a Reply
You must be logged in to post a comment.