Using the Plugin Manager
I often get questions about how to upgrade or install plugins. This really isn’t rocket science but it does happen in a part of Lightroom that you probably don’t get to see very often – the Plugin Manager.
If you’re getting plugins from a reputable vendor such as http://www.lightroom-plugins.com, you’ll get a handy-dandy Windows Installer package which does everything for you. That’s not much use if you use a Mac though, so I’m going to gloss over the automatic installs and go straight for manual installs.
Sounds techy? Tricky? Nah.
Step 1 : Open the Plugin Manager
This bit’s easy. It’s identical on both PC and Mac (I’ll mention if it there are any differences). Go to the File menu in Lightroom, and select “Plug-in Manager”.

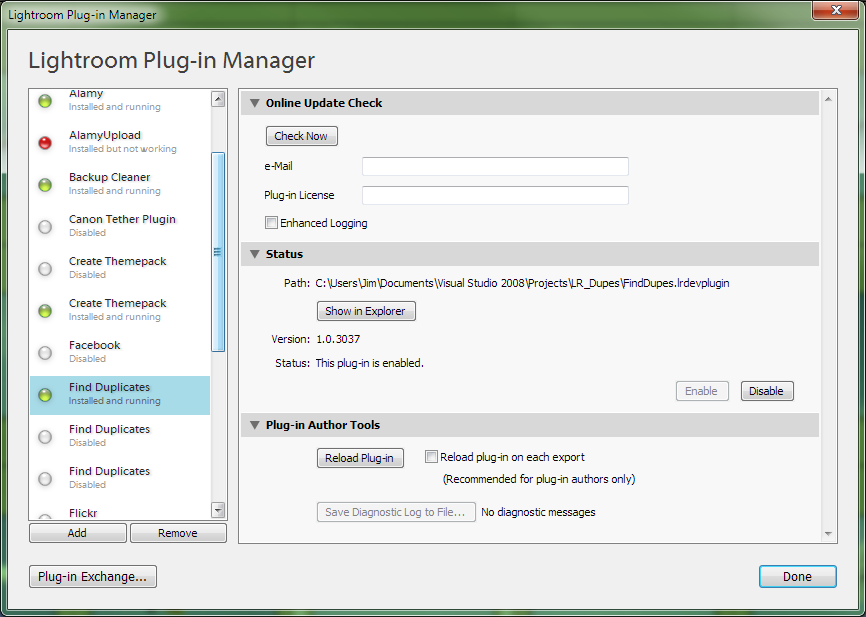
The full glory of the Plugin Manager
Still with me? Good. Down the left you can see a list of plugins – the bit where it says “Find Duplicates”, the under-appreciated “Backup Cleaner” and something called “Facebook”. Green dots show that the plugin is installed and working. Red dots show that it’s installed but broken. Grey dots show that it’s disabled – that is, installed, but deliberately switched off.
Managing a Plugin
You’d expect to be able to Manage your Plugins from the Plugin Manager, right? In this screenshot, the “Find Duplicates” plugin is selected and it has details showing on the right. Some of these details will be different for every plugin, but they will all have the “Status” and “Plug-in Author Tools” sections. Normally these will be closed, but you can open them just by clicking on the little arrow in each section header.
Got a plugin you don’t want to use? Simple – expand the “Status” panel and click “Disable”. Go ahead and try it, nothing is changed permanently. Click “Done” and check in Lightroom, that plugin’s features should all be gone. To get it back, re-open the Plugin Manager, go back to the plugin’s “Status” panel and click “Enable”. The little light goes green and the plugin is back.
Why would you want to do this? Well, maybe something’s behaving badly and you want to check to see if it’s Lightroom or one of the plugins you’ve installed. Maybe you just like the feeling of power.
Adding a Plugin
This wears thin pretty quickly though, even for people with real self-esteem problems. Time to do something more useful. Let’s say that you’ve downloaded a plugin which doesn’t have an automatic installer. That would be most of the plugins that are available. You’re the proud owner of a newly-downloaded zipfile and it’s sat there on your desktop, taunting you. If you don’t have a plugin to practise with, I can heartily recommend this backup cleaner as a starting point.
Let’s show that zipfile who’s boss. Unzip it and you should end up with a folder with a name ending in “.lrplugin”, with a bunch of files inside, some of which will have “.lua” file extensions. Next, move the folder to anywhere you want to keep it; leaving it on your desktop will be messy, and you’re likely to delete it at some point. It doesn’t matter where you put it as long as you can remember where it is for at least 45 seconds.
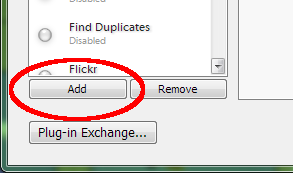
Right, the clock’s ticking. Back to Lightroom and open up that Plugin Manager again. Take a look at the bottom of the list of plugins and you’ll notice a button labelled “Add”.

Manually adding a new plugin
Tempting, isn’t it? Go on, you know you want to.
Right, once you’ve clicked on that button and the shivers of pleasure have died away, you should still be well within your 45-second memory limit and have plenty of time to navigate to wherever you put your plugin folder before you forget where it was. Choose the “.lrplugin” folder and click on the “Select Folder” button.
You should now have a brand-new plugin installed and working. Check in the list for the plugin’s name, and that it has a green light next to it. Lightroom will automatically enable new plugins for you.
Upgrading a Plugin
There’s two ways to go about this. First, you can just overwrite the old plugin’s files with the new one. Unzip it just as you did before and put it in the same place. Start Lightroom up and you should be using the new plugin.
Alternatively, you could put the new version of the plugin in a different place and install it as if it were a different plugin. Why do this? Because if the new one doesn’t work for some reason, you can just disable it and go back to the old one. Lightroom’s quite comfortable with having more than one version of a plugin installed. It knows that they’re the same thing, and automatically disables old versions if it finds that a new version has appeared. If you want to go back to the old version, just use the Plugin Manager to enable it and Lightroom will remember which one you want to use.
Beware! Some plugins may well not appreciate being upgraded and then downgraded again, and the only way to find out is to try it.
What if you can’t remember where it was that you put the plugin in the first place? How do you upgrade it if you can’t find it? Panic!
It’s okay – more than 45 seconds has elapsed since you installed the original version, you’re allowed to forget where you put it. Stop panicking (get a friend to slap you if it helps to restore your composure at this point) and re-open the Plugin Manager.
Remember the “Status” panel? Pick the temporarily misplaced plugin from the list and open the “Status” panel if it’s not already open.

The plugin Status panel, showing where it is and the version.
The top line here is labelled “Path”. This is the exact location of the plugin on your disk. All you need to do is click on “Show in Explorer” or “Show in Finder” and it will open up automatically in the right place. All that’s left to do is to replace the old files with the new ones.
At this point the easiest thing to do is to restart Lightroom. For those who believe that restarting is for wimps, open the final panel, the one labelled “Plug-in Author Tools”. There’s one button on this panel, labelled “Reload Plug-in”. Guess what that does?
Removing a Plugin
So what if you want to remove one? Maybe you don’t need it any more, maybe it was a demo copy and you’ve decided against buying it and don’t want it cluttering up Lightroom.
Again, easy. Find the offending plugin in the Plugin Manager’s list and click on the “Remove” button beneath the list.
The one wrinkle here is that for some plugins, the “Remove” button is greyed out. All this means is that this plugin has been installed in a special place that Lightroom recognises as being for plugins. Just like any other, you can find out exactly where it is by opening the “Status” panel. Because it was installed into this special location, Lightroom loads it automatically without needing to be told to “Add” it. Because you didn’t “Add” it, you also can’t “Remove” it.
Officially, anyway.
If you’re using Windows and installed from an MSI installer, remove the plugin using the normal Windows “Add/Remove Programs” control panel. Otherwise, there’s nothing to stop you using the “Show in Explorer” or “Show in Finder” buttons and then just deleting the plugin by hand.
Leave a Reply
You must be logged in to post a comment.