Import – Develop Defaults
We all know and possibly love Lightroom’s Import dialog. In its basic form it looks like this (from Lightroom 4, but the older versions aren’t too different):

The small import dialog
If this is all you’re seeing, you’re missing out. Take a look through the other article here about the advanced import dialog when you get ten minutes. Right now though, just click on that little downwards arrow in the bottom left hand corner and prepare to be confused amazed!
You know that job you go through every time you import something, to apply a preset in the Develop module to get the right amount of sharpening, noise reduction etc. ? Hopefully you’re already using the Library module’s filtering to help with this, narrowing down the photos in the “Previous Import” to ISO speeds using a Filter, and then applying your favourite preset to a bunch of photos all at once.
It doesn’t take long to do, but it is donkey-work, and Lightroom is quite prepared to do it for you if you ask nicely. This is one of Lightroom’s better-hidden features. For now, cancel the Import dialog and find an image that you haven’t done much work to, or create a Virtual Copy of one and reset it. It should be a fairly “neutral” photo already, with average exposure. We’re going to play with the settings for this image in the Develop module.
First, click the “Reset” button in the Develop module to get the settings back to basic. What we’re going to do is prepare a preset which gets this photo looking more-or-less right, but without making any adjustments that are specific to this photo. A preset, just in case you haven’t come across the term before, is just a collection of settings that you want to remember and be able to re-apply later.
Er, what?
OK, this photo was taken with a specific camera and lens, at a specific ISO rating. It will share some characteristics with every other photo you take with the same camera, lens and ISO rating, most likely the noise and sharpening requirements, and the lens adjustments for chromatic aberration and vignetting. This particular photo might be badly exposed or blurry or have dust-spots, but those will change for each photo – or at least every time you ball up a sock and clean your sensor with it.
What we need to do right now is correct the shared problems – noise, vignetting, sharpening etc. – while temporarily ignoring the specific problems – poor exposure, poor focus, toe-jam.
So, go ahead and play with the Develop module’s tools. Remember, you’re only supposed to blow the bloody doors off fix the stuff that will be wrong for every photo you take with this camera/lens/ISO combination, so keep away from anything that works on exposure or colour balance. You can also do things that you would be likely to do to every photo, so things like the “Presence” controls are fine. Having spent years using Fuji Velvia film, I like to jazz up my digital photos to match, and this kind of general adjustment is ideal to make right now. You really want to be looking at things in the “Detail” and “Lens Corrections” sections and staying away from the shadow/highlight settings.
OK, now what?
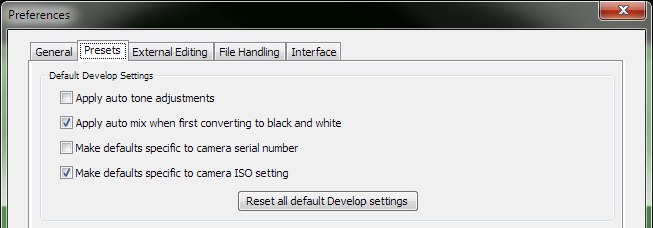
Right. This photo might not look it’s best yet, but we’re well on the way now. Before you do anything else, go to the “Edit” menu, then pick the “Preferences” item, then go to the “Presets” tab. The top bit looks like this (in Lightroom 4 anyway):

Preferences – note the Preset Defaults settings
The settings that are relevant are the “Make defaults specific…” ones. What you choose is entirely up to you, but unless you have more than one camera body of the same model, and they behave entirely differently, I’d suggest leaving the “serial number” setting off. You should definitely have the “ISO setting” one on though, because the ISO setting will affect noise dramatically and this is one of the key things that we’re going to correct for. Click OK in here when you’re done.
What you’ve just done is to tell Lightroom that instead of using the standard, one-size-fits-none develop settings, you want it to remember a different set of defaults for each combination of camera model and ISO speed. This kind of makes sense, right? A Canon 5D at ISO 400 produces a very different photo than a Nikon D60 at ISO 400, so why would you want Lightroom to apply the same basic settings to both photos?
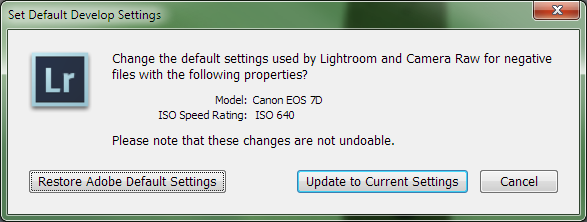
Go to the “Develop” menu and select the “Set Default Settings” item. You’ll get a dialog like this one:

An example default settings dialog, for Canon 7D at ISO 640
If you click on “Update to Current Settings”, Lightroom will forever more associate the current combination of Develop module settings with this camera and ISO rating.
So, back to the start. The first thing to know is that this setting has no effect whatsoever on photos that you’ve already imported. It does have an effect on all future imports, which is kind of the point here. From now on, when you import a photo that was taken on an EOS 7D set to ISO 640, this set of Develop settings will be applied automagically.
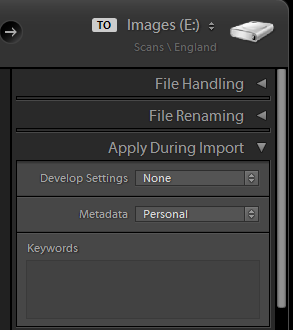
Well, probably. It won’t get used if you tell Lightroom specifically to do something else. Remember the advanced import dialog? Look down the right-hand side and expand the “Apply During Import” panel.

One easy way to not have your automatic presets applied!
See the “Develop Settings” dropdown? If you click on this you’ll get a drop-down list with all your saved Develop presets. If you choose one of those here, Lightroom will do exactly what you tell it to and apply that to each and every photo that’s imported. This means that it won’t apply the default settings that you lovingly crafted five minutes ago. To use those, you need to have this “Develop Settings” box set to “None”. I really think that Adobe should have had this called “Default” rather than “None”, but there you go.
Your next mission, should you choose to accept it, is to go back and do the same for each ISO rating that you use.
- Find a representative photo (remember the Filtering in the Library module)
- Reset it in Develop module
- Adjust presence, sharpening, noise reduction, get Lens Corrections set to Auto
- Use the Develop->Default Settings menu to store these settings
I grant that this is a half-hour of work that you hadn’t expected to do today. Remember though, every time you import photos in the future they will already have the right basic settings. Even if you’re already applying saved presets by hand, you’ll no longer need to do even that, you can just get right down to the tweaking of individual photos. That’ll save you a half-hour per import or, if you were just applying one setting to all your photos, give you the benefit of having more accurate adjustments for each ISO level.
If you’re not sure whether your new default presets are being applied, remember that you can always update them. Try saving one with a really visible change, say ramping the exposure right up, and the import some photos to check that it really is applied. Once you’re confident, put things back the way they should be and just update that preset again using the “Develop->Set Default Settings” menu.
Leave a Reply
You must be logged in to post a comment.